
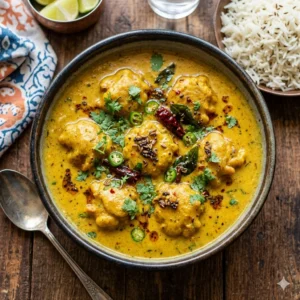
There are some meals that instantly transport you back to childhood. For many South Asian families, Curry Pakora (also known as Kadhi Pakora) is one of those unforgettable comfort foods. A bowl of rich, tangy yogurt curry filled with soft onion pakoras and served over steaming rice has a way of making even the busiest day feel a little calmer.
Traditionally, however, making Curry Pakora isn’t exactly a quick process. Many home cooks reserve it for weekends because preparing the silky yogurt gravy often requires constant stirring, slow simmering, and plenty of patience.
But what if you could enjoy the same creamy texture and authentic flavor in almost half the time?
The good news is—you absolutely can.
After experimenting with a few cooking shortcuts, I discovered a method that dramatically reduces the cooking time without sacrificing the rich taste or velvety texture that makes Curry Pakora so special. Instead of spending hours standing over the stove, this recipe lets modern kitchen tools do most of the work for you.
Whether you’re cooking after work, preparing a family dinner, or simply craving homemade comfort food, this shortcut method delivers outstanding results in about 35 minutes.
Why Traditional Curry Pakora Takes So Long
Understanding the science behind Curry Pakora makes this shortcut much easier to appreciate.
The curry is made by combining yogurt, gram flour (besan), spices, and water. While it seems simple, two things happen during cooking:
- The gram flour thickens as it cooks by absorbing liquid and releasing starches.
- The yogurt proteins become delicate when heated. If the mixture heats unevenly, the yogurt can split or curdle.
That is why traditional recipes recommend stirring continuously until the curry reaches a boil. Once it thickens, it must continue simmering so the raw taste of the besan completely disappears.
The process certainly works—but it demands a lot of time.
This shortcut speeds up both of those stages while producing the same delicious outcome.
The Time-Saving Secret
Instead of relying entirely on slow cooking, this recipe uses three simple tricks:
- Blend the yogurt and gram flour together until completely smooth.
- Use boiling water instead of cold water.
- Let the curry simmer while preparing the pakoras.
These small adjustments save nearly an hour of cooking without changing the authentic flavor.
Ingredients
For the Curry
- 1 cup sour yogurt
- ⅓ cup gram flour (besan)
- 4 cups water (2 cups room temperature + 2 cups boiling)
- 1 teaspoon turmeric
- 1 teaspoon red chili powder
- 1 teaspoon coriander powder
- Salt to taste
For Tempering
- 2 tablespoons oil
- 1 teaspoon mustard seeds
- 1 teaspoon fenugreek seeds
- 1 chopped onion
- 1 tablespoon ginger-garlic paste
- A pinch of asafoetida (hing)
For the Pakoras
- 2 medium onions, thinly sliced
- ½ cup gram flour
- 2 green chilies, chopped
- Fresh cilantro
- ½ teaspoon carom seeds (ajwain)
- Salt
- Small pinch baking soda
- Water as needed
- Oil for frying
Final Tadka
- 1 tablespoon ghee
- 1 teaspoon cumin seeds
- 2 dried red chilies
- Fresh curry leaves
- ½ teaspoon Kashmiri chili powder
Step 1: Blend the Curry Base
Instead of whisking everything by hand, simply add the following to a blender:
- Yogurt
- Gram flour
- Turmeric
- Chili powder
- Coriander powder
- Two cups of water
Blend for about 30 seconds.
The result should be a completely smooth, lump-free mixture. This simple step removes one of the biggest frustrations of making Curry Pakora.
Step 2: Build the Flavor Base
Heat oil in a heavy-bottomed pot.
Add:
- Mustard seeds
- Fenugreek seeds
Allow them to crackle before adding:
- Ginger-garlic paste
- Chopped onion
Cook until the onions become soft and lightly golden.
This creates the aromatic foundation of the curry.
Step 3: Speed Up the Cooking
Pour the blended yogurt mixture into the pot.
Immediately add two cups of boiling water.
Using boiling water allows the curry to reach cooking temperature much faster than starting with cold water.
Stir continuously for only two to three minutes until it begins to thicken.
Reduce the heat.
Cover the pot and allow it to simmer gently for about 15 minutes.
During this time, the raw flavor of the gram flour disappears naturally.
Step 4: Prepare the Pakoras
While the curry simmers, prepare the onion fritters.
Mix together:
- Sliced onions
- Gram flour
- Cilantro
- Green chilies
- Ajwain
- Salt
- Tiny pinch baking soda
- Splash of water
The onions should be coated with a thick batter rather than swimming in it.
Drop spoonfuls into hot oil.
Fry until beautifully golden and crispy.
Drain on paper towels.
Step 5: Assemble the Curry
Once the curry has thickened nicely, gently add the hot pakoras.
Turn off the heat.
Allow them to sit inside the curry for several minutes.
They’ll gradually absorb the flavorful gravy while staying soft without becoming mushy.
Step 6: Finish with the Tadka
Heat ghee in a small pan.
Add:
- Cumin seeds
- Dried red chilies
- Curry leaves
Finally sprinkle in Kashmiri chili powder.
As soon as everything begins to sizzle, immediately pour the hot tempering over the Curry Pakora.
The sizzling aroma is one of the most satisfying moments in South Asian cooking.
What Makes This Shortcut Work?
Many people assume quicker recipes sacrifice quality.
This one doesn’t.
The blender eliminates lumps
Blending thoroughly distributes the gram flour evenly throughout the yogurt.
Boiling water speeds gelatinization
Because the liquid is already hot, the curry thickens much faster.
Simmering finishes the flavor
The curry still gets enough cooking time for the gram flour to fully develop its rich flavor.
Tips for the Best Curry Pakora
Use slightly sour yogurt
Fresh yogurt won’t provide enough tanginess.
Older yogurt gives Curry Pakora its signature flavor.
Don’t skip the hing
A pinch of asafoetida adds authentic flavor while helping digestion.
Fry pakoras until deep golden
Crispier pakoras absorb the curry better without falling apart.
Add pakoras just before serving
If you love soft pakoras, let them soak for 10–15 minutes.
If you prefer more texture, add them immediately before serving.
Adjust consistency
The curry naturally thickens as it cools.
Simply stir in a little warm water before reheating.
Serving Suggestions
Curry Pakora tastes incredible with:
- Steamed basmati rice
- Jeera rice
- Plain naan
- Tandoori roti
- Pickled onions
- Green chutney
- Mango pickle
- Fresh coriander garnish
A side of crispy papad also makes an excellent addition.
Storage Tips
Store leftovers in an airtight container in the refrigerator for up to 3 days.
When reheating:
- Warm gently over low heat.
- Add a splash of water if needed.
- Avoid boiling vigorously.
The flavors often become even richer the next day.
Common Mistakes to Avoid
Using sweet yogurt
Always use sour yogurt for authentic flavor.
Skipping the blending step
Small lumps of gram flour are difficult to remove later.
Overcrowding the frying pan
Pakoras fry best in small batches.
Cooking over very high heat
After the initial boil, gentle simmering creates the smoothest texture.
Why This Recipe Is Perfect for Busy Weeknights
Modern life doesn’t always leave room for recipes that require hours of attention.
This shortcut allows you to enjoy a traditional homemade meal without spending your entire evening in the kitchen.
Instead of constantly stirring, you can prepare the pakoras while the curry quietly simmers.
The result is every bit as comforting as the traditional version—just much faster.
Final Thoughts
Traditional recipes deserve respect, but there’s nothing wrong with making them fit today’s busy lifestyle.
This shortcut keeps everything people love about Curry Pakora—its creamy yogurt gravy, tangy flavor, fluffy pakoras, and aromatic tempering—while reducing both effort and cooking time.
The next time you’re craving this classic comfort food, don’t wait for the weekend. Grab your blender, heat the kettle, and enjoy a bowl of homemade Curry Pakora in about 35 minutes.
One bite is all it takes to understand that smart cooking doesn’t mean compromising on taste.
Frequently Asked Questions
Can I bake the pakoras instead of frying?
Yes. Although fried pakoras have the most authentic texture, baking or air frying works well for a lighter version.
Can I freeze Curry Pakora?
The curry freezes well, but fresh pakoras always taste best. Freeze the curry separately and prepare fresh pakoras before serving.
Why did my curry curdle?
Usually because the yogurt heated too quickly or wasn’t mixed properly with the gram flour. Blending helps prevent this problem.
Can I make it gluten-free?
Yes. Gram flour is naturally gluten-free, making Curry Pakora suitable for most gluten-free diets.
References
If you’d like to explore more versions of Curry Pakora, these trusted recipes are worth checking out: